Nov 15, 2023
Integrating Auth.js (NextAuth) and Prisma with SvelteKit
let's see how to integrate Github and Google OAuth authentication using Auth.js (NextAuth) and Prisma with SvelteKit and protected routes and redirects
Let's see how we can implement Auth.js (NextAuth) and Prisma with SvelteKit
Note: Auth.js is still experimental at the time of writing this article. So there might be some breaking changes in the future. But it reamins same for the most part.
we will be using the following stack for this project.
- SvelteKit
- TypeScript
- Prisma
- Auth.js (NextAuth)
- TailwindCSS
- Shadcn-ui (svelte port made by Huntabyte)
So, let's get started.
Creating a SvelteKit project and adding TailwindCSS, Shadcn-ui
First, we need to create a sveltekit project. We can do that by using the following command.
npm create svelte@latest my-app
chose your preferred configuration and then add tailwindcss to the project using the below command.
npx svelte-add@latest tailwindcss
and install the dependencies using the following command.
npm install
Now, we need to install shadcn-ui.
npx shadcn-svelte@latest init
You will be asked a few questions to configure
Which style would you like to use? › Default
Which color would you like to use as base color? › Slate
Where is your global CSS file? › src/app.postcss
Where is your tailwind.config.[cjs|js|ts] located? › tailwind.config.js
Configure the import alias for components: › $lib/components
Configure the import alias for utils: › $lib/utils
we will be using few components from shadcn-ui. so we need to install them.
npx shadcn-svelte@latest add button card avatar dropdown-menu
Setting up Prisma
Now, we need to setup prisma. We can do that by using the following command and we also install prisma client and adapter for Auth.js (NextAuth). I will be using vercel postgres database. You can use any database you want.
npm install prisma @prisma/client @next-auth/prisma-adapter
let's set up prisma using
npx prisma init
this will generate a schema.prisma file in a directory named prisma. We need to edit it to add our models. We will be adding a user model and a session model.
Auth.js (NextAuth) setup
Now, we need to setup Auth.js (NextAuth). We can do that by using the following command.
npm install @auth/core @auth/sveltekit
Auth.js (NextAuth) uses a database adapter to store the user data. We will be using prisma adapter (which we've installed earlier) for this project.
Auth.js (NextAuth) provides us with different models for the database like User, Session, Account, VerificationRequest etc.
here are those schemas. it's very much important to add these as it is to your schema.prisma file. I've tried other different schema models but it didn't work. so i'm using these models. you can also use these models.
```prisma title="schema.prisma" model Account { id String @id @default(cuid()) userId String type String provider String providerAccountId String refresh_token String? @db.Text access_token String? @db.Text expires_at Int? token_type String? scope String? id_token String? @db.Text session_state String?
user User @relation(fields: [userId], references: [id], onDelete: Cascade)
@@unique([provider, providerAccountId]) @@index([userId]) }
model Session { id String @id @default(cuid()) sessionToken String @unique userId String expires DateTime user User @relation(fields: [userId], references: [id], onDelete: Cascade)
@@index([userId]) }
model User { id String @id @default(cuid()) name String? email String? @unique emailVerified DateTime? image String? accounts Account[] sessions Session[] }
model VerificationToken { identifier String token String @unique expires DateTime
@@unique([identifier, token]) }
you need to add these models to your `schema.prisma` file.
generator client { provider = "prisma-client-js" }
datasource db { provider = "postgresql" url = env("POSTGRES_PRISMA_URL") // uses connection pooling directUrl = env("POSTGRES_URL_NON_POOLING") // uses a direct connection }
model Account { id String @id @default(cuid()) userId String type String provider String providerAccountId String refresh_token String? @db.Text access_token String? @db.Text expires_at Int? token_type String? scope String? id_token String? @db.Text session_state String?
user User @relation(fields: [userId], references: [id], onDelete: Cascade)
@@unique([provider, providerAccountId]) @@index([userId]) }
model Session { id String @id @default(cuid()) sessionToken String @unique userId String expires DateTime user User @relation(fields: [userId], references: [id], onDelete: Cascade)
@@index([userId]) }
model User { id String @id @default(cuid()) name String? email String? @unique emailVerified DateTime? image String? accounts Account[] sessions Session[] }
model VerificationToken { identifier String token String @unique expires DateTime
@@unique([identifier, token]) }
this is what your `schema.prisma` file should look like. Note that, `DIRECT_URL` is optional and don't forget to add `DATABASE_URL` in `.env`.

after that, we need to generate the prisma client. We can do that by using the following command.
npx prisma generate
The generate command generates assets like Prisma Client based on the generator and data model blocks defined in your `prisma/schema.prisma` file.
The generate command is most often used to generate Prisma Client with the prisma-client-js generator.

create a new file named `db.server.ts` inside `src/lib` directory and add the following code to it.
import { PrismaClient } from '@prisma/client';
// expose a singleton export const db = new PrismaClient();
we use this file to expose a singleton of the prisma client and we can use this in our project to access the database.

now we need to push the schema to the database. so that the tables will be created.
npx prisma db push
you can see those tables in your database by running the prisma studio.
npx prisma studio
this will open a browser window with the prisma studio. you can see the tables there.
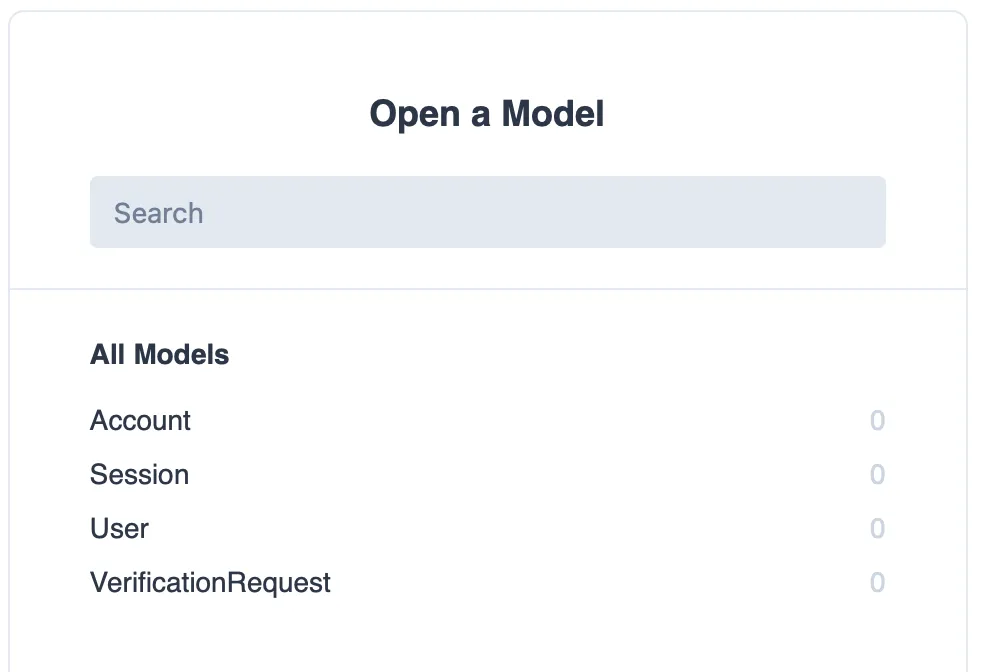
you can also see those tables in your database in my case it's vercel postgres. so i can open up my vercel and see the tables there.
## Adding Auth.js (NextAuth) to the project
to add Auth.js (NextAuth) to the project, we need to create a file named `hooks.server.ts` in `src` directory.
import { SvelteKitAuth } from '@auth/sveltekit'; import Google from '@auth/core/providers/google'; import GitHub from '@auth/core/providers/github'; import { PrismaAdapter } from '@next-auth/prisma-adapter'; import { db } from '$lib/db.server'; import { GOOGLE_SECRET, GOOGLE_ID, GITHUB_SECRET, GITHUB_ID } from '$env/static/private'; import type { Adapter } from '@auth/core/adapters';
export const handle = SvelteKitAuth({ adapter: PrismaAdapter(db) as Adapter, session: { strategy: 'database', generateSessionToken: () => { return crypto.randomUUID(); // generate a uuid } }, providers: [ GitHub({ clientId: GITHUB_ID, clientSecret: GITHUB_SECRET }), Google({ clientId: GOOGLE_ID, clientSecret: GOOGLE_SECRET }) ] });
note that, for using OAuth providers like Google and Github, you need to create OAuth apps in their respective developer consoles and get the `client id` and `client secret`. I have added those to `.env` file and i'm importing them from there, add also AUTH_SECRET and NEXTAUTH_SECRET to `.env` file. you can generate a random string using `openssl rand -base64 32` and add it to `.env` file.

your `.env` file should look like this.
POSTGRES_URL="postgres://default:**@ep-autumn-cherry-00149263-pooler.us-east-1.postgres.vercel-storage.com:5432/verceldb" GOOGLE_ID="238352474330-0g3c78cn7o93o2979tatjt9bdvr8496h.apps.googleusercontent.com" GOOGLE_SECRET="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" GITHUB_ID="c8458ef2c5288d93af54" GITHUB_SECRET="68801a7ba6caf48550acc2d4bad6c67d50b25e12" AUTH_SECRET="58383abb3d6c7f7fb02eb71d97bd6dc7" NEXTAUTH_SECRET="58383abb3d6c7f7fb02eb71d97bd6dc7"
Get Google and Github Client and Secret ID's
to get google's Client and Secret ID, go to google developers console or follow [this](https://developers.google.com/identity/gsi/web/guides/get-google-api-clientid) guide from google
and for Github, it's pretty easy. just go to Github developers settings and under OAuth Apps, add a new app and follow the on-screen instructions.
One thing to be clear is that, while testing in local environment, you homepage URL (or javascript origins in google) must be http://localhost:5173, replace `5173` with your port number where your app runs and callback URL (or redirect) should be
http://localhost:xxxx/auth/callback/provider, replace provider with github and google in their respective consoles.

we are almost done with the setup. Now on to the SvelteKit part where we will be creating the login and protected routes.

## Creating Routes

let's create following routes.

- `/` - Home page
- `/login` - Login page
- `/dashboard` - Dashboard page (protected route)

First, let's create Navbar where we will have login button and if users are logged in, we will show their name and profile picture.

create a file named `navbar.svelte` in `src/lib/components` directory and add the following code to it.
<script> // src/lib/components/Navbar.svelte import as Avatar from "$lib/components/ui/avatar"; import as DropdownMenu from "$lib/components/ui/dropdown-menu"; import { page } from "$app/stores"; // we will get the session info from here import { AuthButton } from "$lib/components";
const links = [ // { name: 'Profile', href: '/profile' }, { name: "Dashboard", href: "/dashboard" }, // { name: "About", href: "/about" }, ]; </script>
<nav class="fixed top-0 left-0 right-0 z-50 flex items-center justify-between h-20 border-b-2 shadow-sm text-foreground backdrop-opacity-100 backdrop-blur-3xl backdrop-brightness-100 dark:backdrop-brightness-50 border-foreground/80"
<div class="container flex items-center justify-between w-full px-4 mx-auto max-w-7xl"
<a href="/" class="text-2xl font-semibold tracking-tight transition-colors"
SvelteKit OAuth
</a> <div class="flex items-center gap-2"> {#if $page.data.session} <DropdownMenu.Root> <DropdownMenu.Trigger> <Avatar.Root> <Avatar.Image src={$page.data.session.user?.image} alt={$page.data.session.user?.name} /> <Avatar.Fallback> {${$page.data.session.user?.name?.split(" ")[0][0]}${ $page.data.session.user?.name?.split(" ")[1][0] }} </Avatar.Fallback> </Avatar.Root> </DropdownMenu.Trigger> <DropdownMenu.Content class="min-w-[150px] z-50"> <DropdownMenu.Group> <DropdownMenu.Label> {$page.data.session.user?.name} </DropdownMenu.Label> <DropdownMenu.Separator /> {#each links as link (link.href)} <DropdownMenu.Item class={$page.url.pathname === link.href ? "bg-foreground/10 text-foreground" : "hover:bg-foreground/10"}
<a href={link.href} class="w-full">{link.name}</a> </DropdownMenu.Item> {/each} <DropdownMenu.Separator /> <DropdownMenu.Item class="p-[2px]"> <AuthButton /> </DropdownMenu.Item> </DropdownMenu.Group> </DropdownMenu.Content> </DropdownMenu.Root> {:else} <AuthButton /> {/if} </div> </div> </nav>
add that `Navbar` component to `+layout.svelte` file in your root directory.
<script> // src/routes/+layout.svelte import '../app.postcss'; import { Navbar } from '$lib/components'; </script>
<Navbar />
<div class="h-screen pt-20"> <div class="h-full"> <slot /> </div> </div>
and in your `+page.svelte` file inside your `src/routes` directory, add the following code.
<script> // src/routes/+page.svelte import { page } from '$app/stores'; </script>
<div class="flex flex-col items-center justify-center h-full gap-4"> <h1 class="text-5xl">Home Page</h1> {#if $page.data.session} Welcome back, <span class="text-4xl">{$page.data.session.user?.name}!</span> {/if} </div>
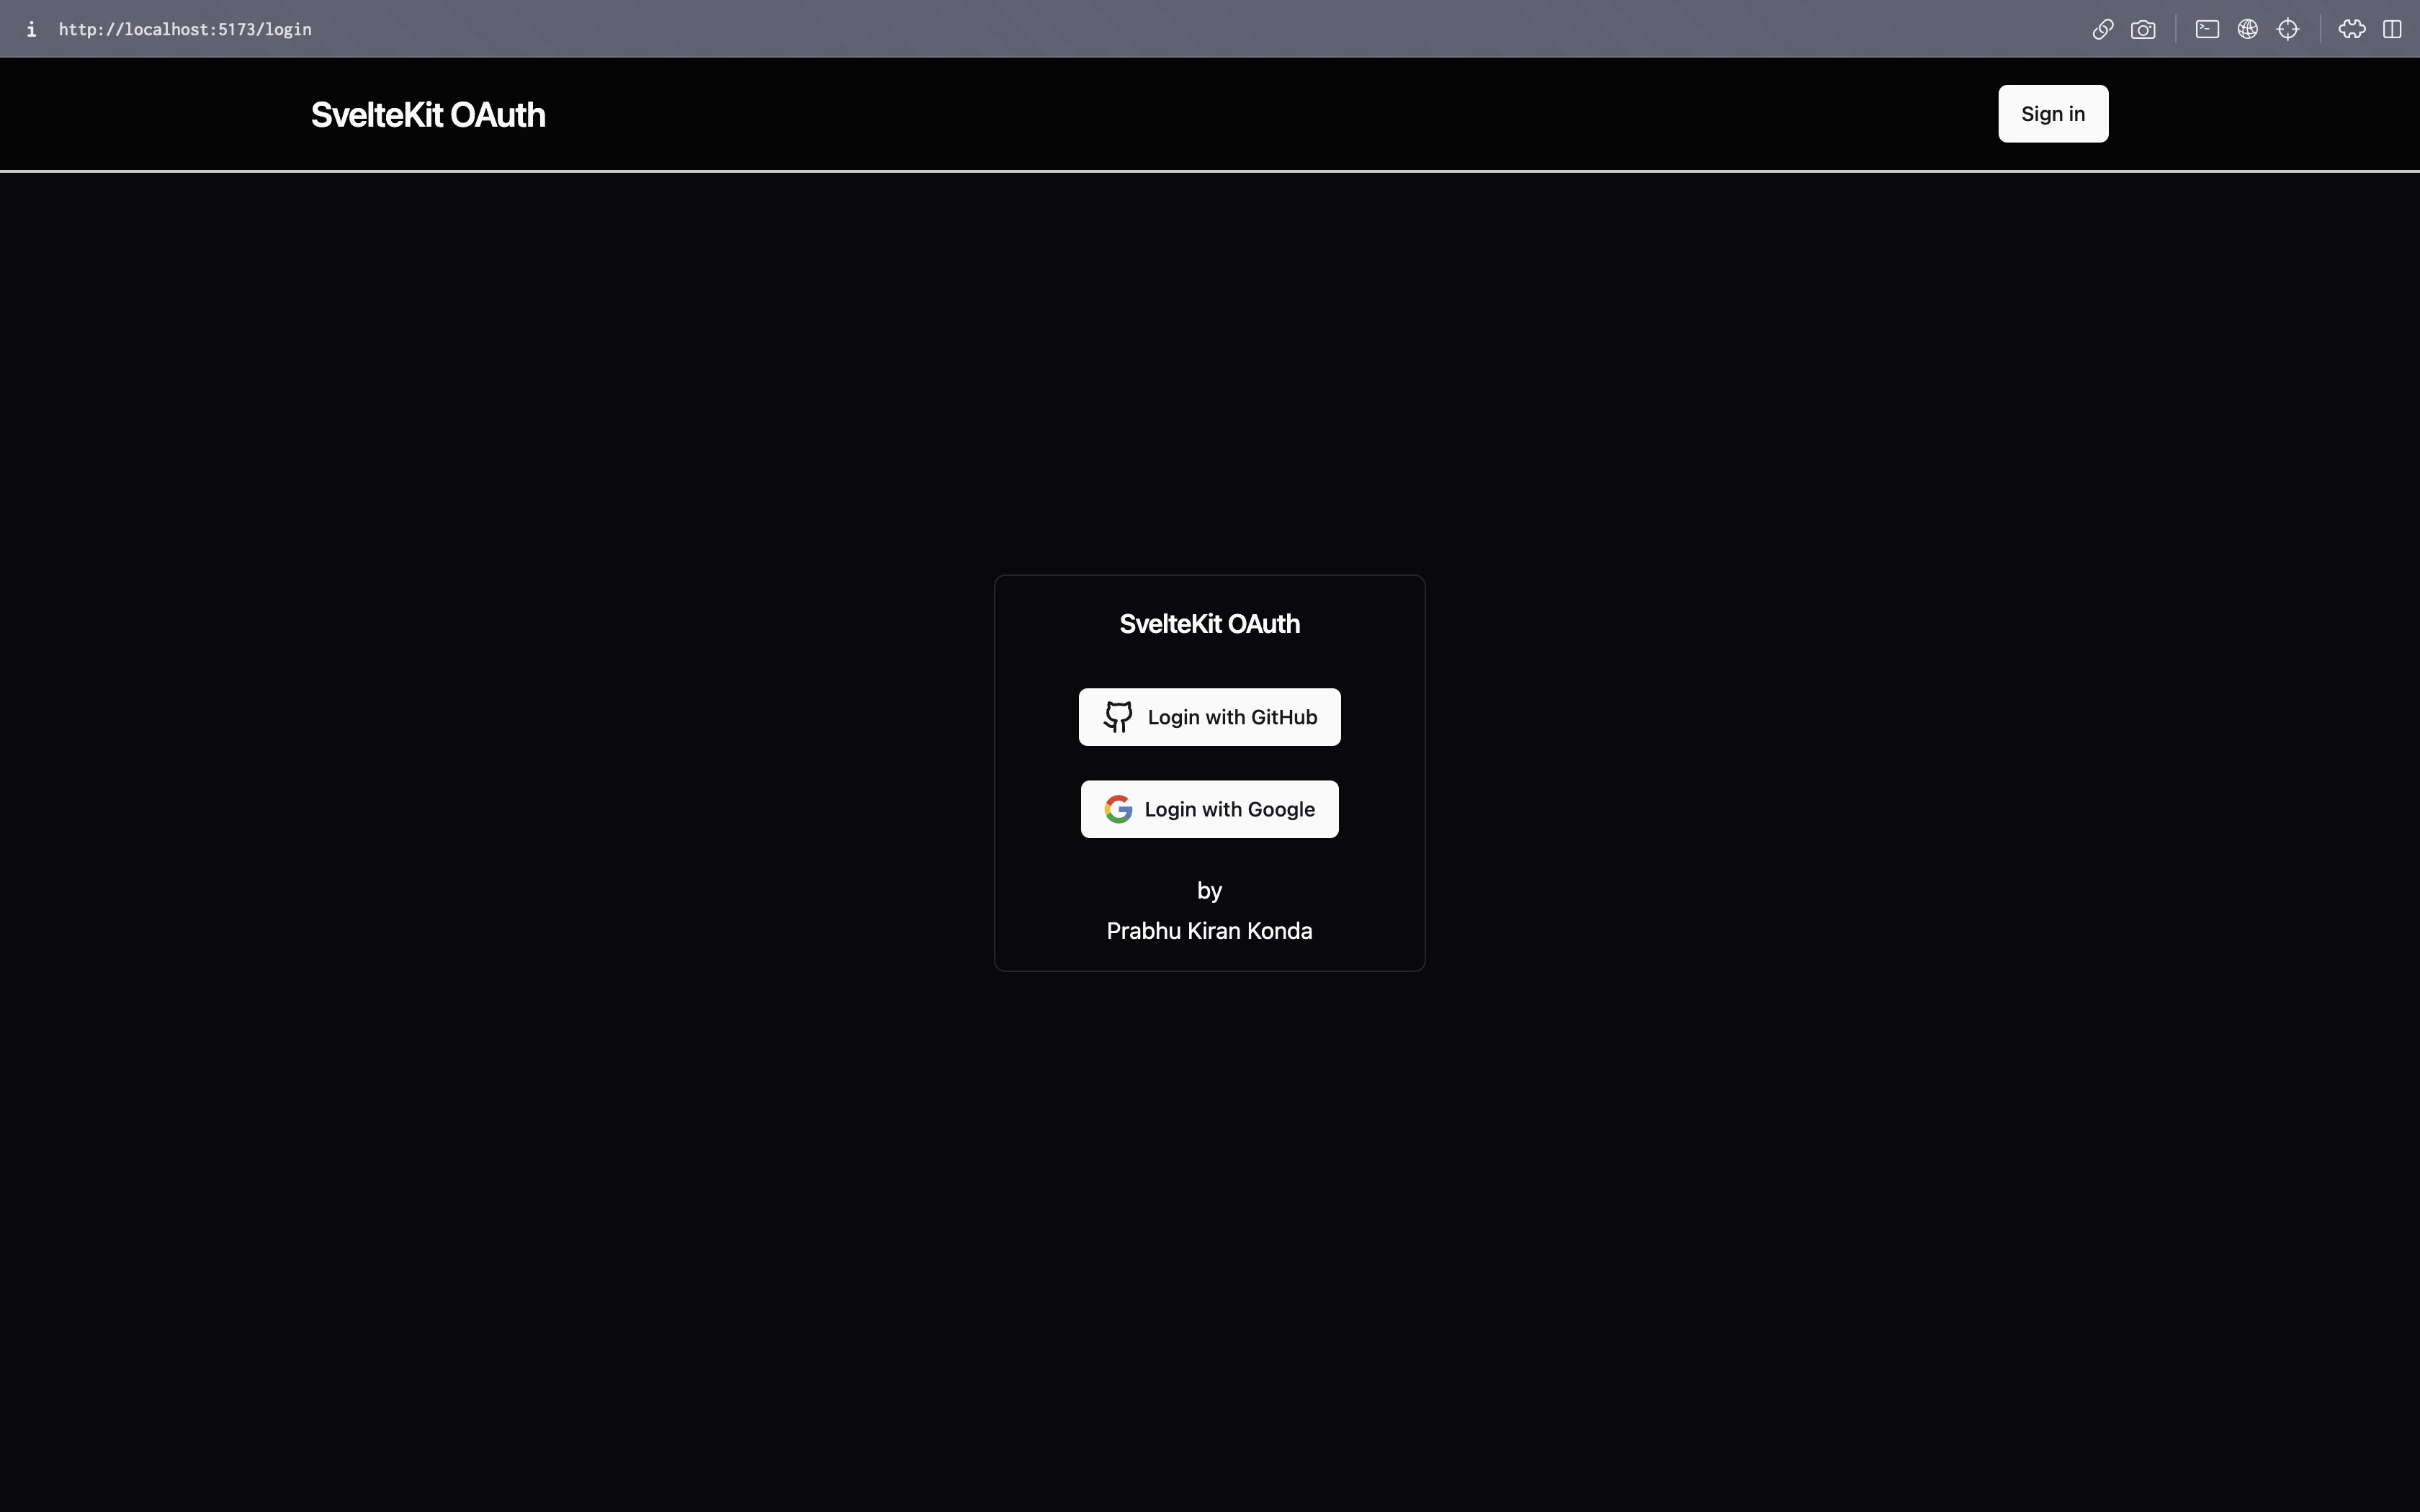
if you run the project now, you will see the navbar and if you click on the login button, you will be redirected to the login page but we haven't created the login page yet. so let's create it. And in our home page if the user is logged in, we will show their name.

let's create a login routes
<script lang="ts"> // src/routes/login/+page.svelte import { page } from '$app/stores'; import Button from '$lib/components/ui/button/button.svelte'; import * as Card from '$lib/components/ui/card'; import { signIn } from '@auth/sveltekit/client'; import { Github } from 'lucide-svelte'; const redirectUrl = $page.url.searchParams.get('redirectTo') || '/dashboard';
const githubLogin = async () => { if (!$page.data.session) { await signIn('github', { callbackUrl: ${redirectUrl} }); } };
const googleLogin = async () => { if (!$page.data.session) { await signIn('google', { callbackUrl: ${redirectUrl} }); } }; </script>
<svelte:head> <title>Login | Dall-E Clone</title> <meta name="robots" content="noindex nofollow" /> <html lang="en" /> </svelte:head>
<div class="flex items-center justify-center h-full -mt-12 overflow-x-hidden"> <Card.Root class="w-[300px] rounded-lg flex flex-col items-center justify-center"> <Card.Header> <Card.Title class="text-center">Dall-E Clone | SvelteKit</Card.Title> <Card.Description class="text-center">AI Image Generation</Card.Description> </Card.Header> <Card.Content class="p-3"> <div class="flex flex-col items-center justify-center gap-6"> <button on:click="{githubLogin}"> <Github class="w-6 h-6 mr-2" /> Login with GitHub </button> <button on:click="{googleLogin}"> <svg viewBox="0 0 128 128" class="w-5 h-5 mr-2"> <path fill="#fff" d="M44.59 4.21a63.28 63.28 0 004.33 120.9 67.6 67.6 0 0032.36.35 57.13 57.13 0 0025.9-13.46 57.44 57.44 0 0016-26.26 74.33 74.33 0 001.61-33.58H65.27v24.69h34.47a29.72 29.72 0 01-12.66 19.52 36.16 36.16 0 01-13.93 5.5 41.29 41.29 0 01-15.1 0A37.16 37.16 0 0144 95.74a39.3 39.3 0 01-14.5-19.42 38.31 38.31 0 010-24.63 39.25 39.25 0 019.18-14.91A37.17 37.17 0 0176.13 27a34.28 34.28 0 0113.64 8q5.83-5.8 11.64-11.63c2-2.09 4.18-4.08 6.15-6.22A61.22 61.22 0 0087.2 4.59a64 64 0 00-42.61-.38z" /> <path fill="#e33629" d="M44.59 4.21a64 64 0 0142.61.37 61.22 61.22 0 0120.35 12.62c-2 2.14-4.11 4.14-6.15 6.22Q95.58 29.23 89.77 35a34.28 34.28 0 00-13.64-8 37.17 37.17 0 00-37.46 9.74 39.25 39.25 0 00-9.18 14.91L8.76 35.6A63.53 63.53 0 0144.59 4.21z" /> <path fill="#f8bd00" d="M3.26 51.5a62.93 62.93 0 015.5-15.9l20.73 16.09a38.31 38.31 0 000 24.63q-10.36 8-20.73 16.08a63.33 63.33 0 01-5.5-40.9z" /> <path fill="#587dbd" d="M65.27 52.15h59.52a74.33 74.33 0 01-1.61 33.58 57.44 57.44 0 01-16 26.26c-6.69-5.22-13.41-10.4-20.1-15.62a29.72 29.72 0 0012.66-19.54H65.27c-.01-8.22 0-16.45 0-24.68z" /> <path fill="#319f43" d="M8.75 92.4q10.37-8 20.73-16.08A39.3 39.3 0 0044 95.74a37.16 37.16 0 0014.08 6.08 41.29 41.29 0 0015.1 0 36.16 36.16 0 0013.93-5.5c6.69 5.22 13.41 10.4 20.1 15.62a57.13 57.13 0 01-25.9 13.47 67.6 67.6 0 01-32.36-.35 63 63 0 01-23-11.59A63.73 63.73 0 018.75 92.4z" /> </svg> Login with Google </button> </div> </Card.Content> <Card.Footer class="flex flex-col items-center justify-center p-3"> <p>by</p> <p class="p-1">Prabhu Kiran Konda</p> </Card.Footer> </Card.Root> </div>
and the most important thing is to add `+page.server.ts` file to all your routes as we use per path authentication. it will export a load function that contains the session info. so that we can use it in our components. we can use a common `+layout.server.ts` but that's not secure.
import { redirect } from '@sveltejs/kit';
export const load = async (event) => { const session = await event.locals.getSession(); + // only in src/routes/login/+page.server.ts + if (session?.user) { + throw redirect(303, '/dashboard'); + } return { session }; }
this code is common to all routes. but only in login route, add a redirect block. what it does is, if a session is already there which means the user is already logged in, then we redirect them to dashboard page even if they try to access the login page.

we are missing one component that is `AuthButton` that we have used in our Navbar. let's create that component.
<script> // src/lib/components/AuthButton.svelte import { page } from "$app/stores"; import { signOut } from "@auth/sveltekit/client"; import Button from "./ui/button/button.svelte"; </script>
{#if !$page.data.session} <a href="/login" class="buttonClass"> Sign in </a> {:else} <Button on:click={() => { signOut({ callbackUrl: "/", }); }} class="w-full">Sign out</Button
{/if}
if the user is not logged in, we show a login button and if the user is logged in, we show a logout button and if the user clicks on the logout button, we sign them out and redirect them to the home page.

now, let's create a dashboard page. we will be using the same code that we have used in our home page.
<script> // src/routes/dashboard/+page.svelte export let data; </script>
<div class="flex flex-col items-center justify-center h-full gap-4"> {#if data.session} <h1 class="text-5xl">Dashboard</h1> Welcome back,<span class="text-4xl">{data.session.user?.name}!</span> {/if} </div>
and in `routes/dashboard/+page.server.ts` file, add the following code.
// src/routes/dashboard/+page.server.ts import { redirect } from "@sveltejs/kit"; import type { PageServerLoad } from "../$types";
export const load: PageServerLoad = async (event) => { const session = await event.locals.getSession(); + // only in src/routes/dashboard/+page.server.ts + const fromUrl = event.url.pathname + event.url.search; + if (!session?.user) { + throw redirect(303, /login?redirectTo=${fromUrl}); + }
return { session, }; }; ```
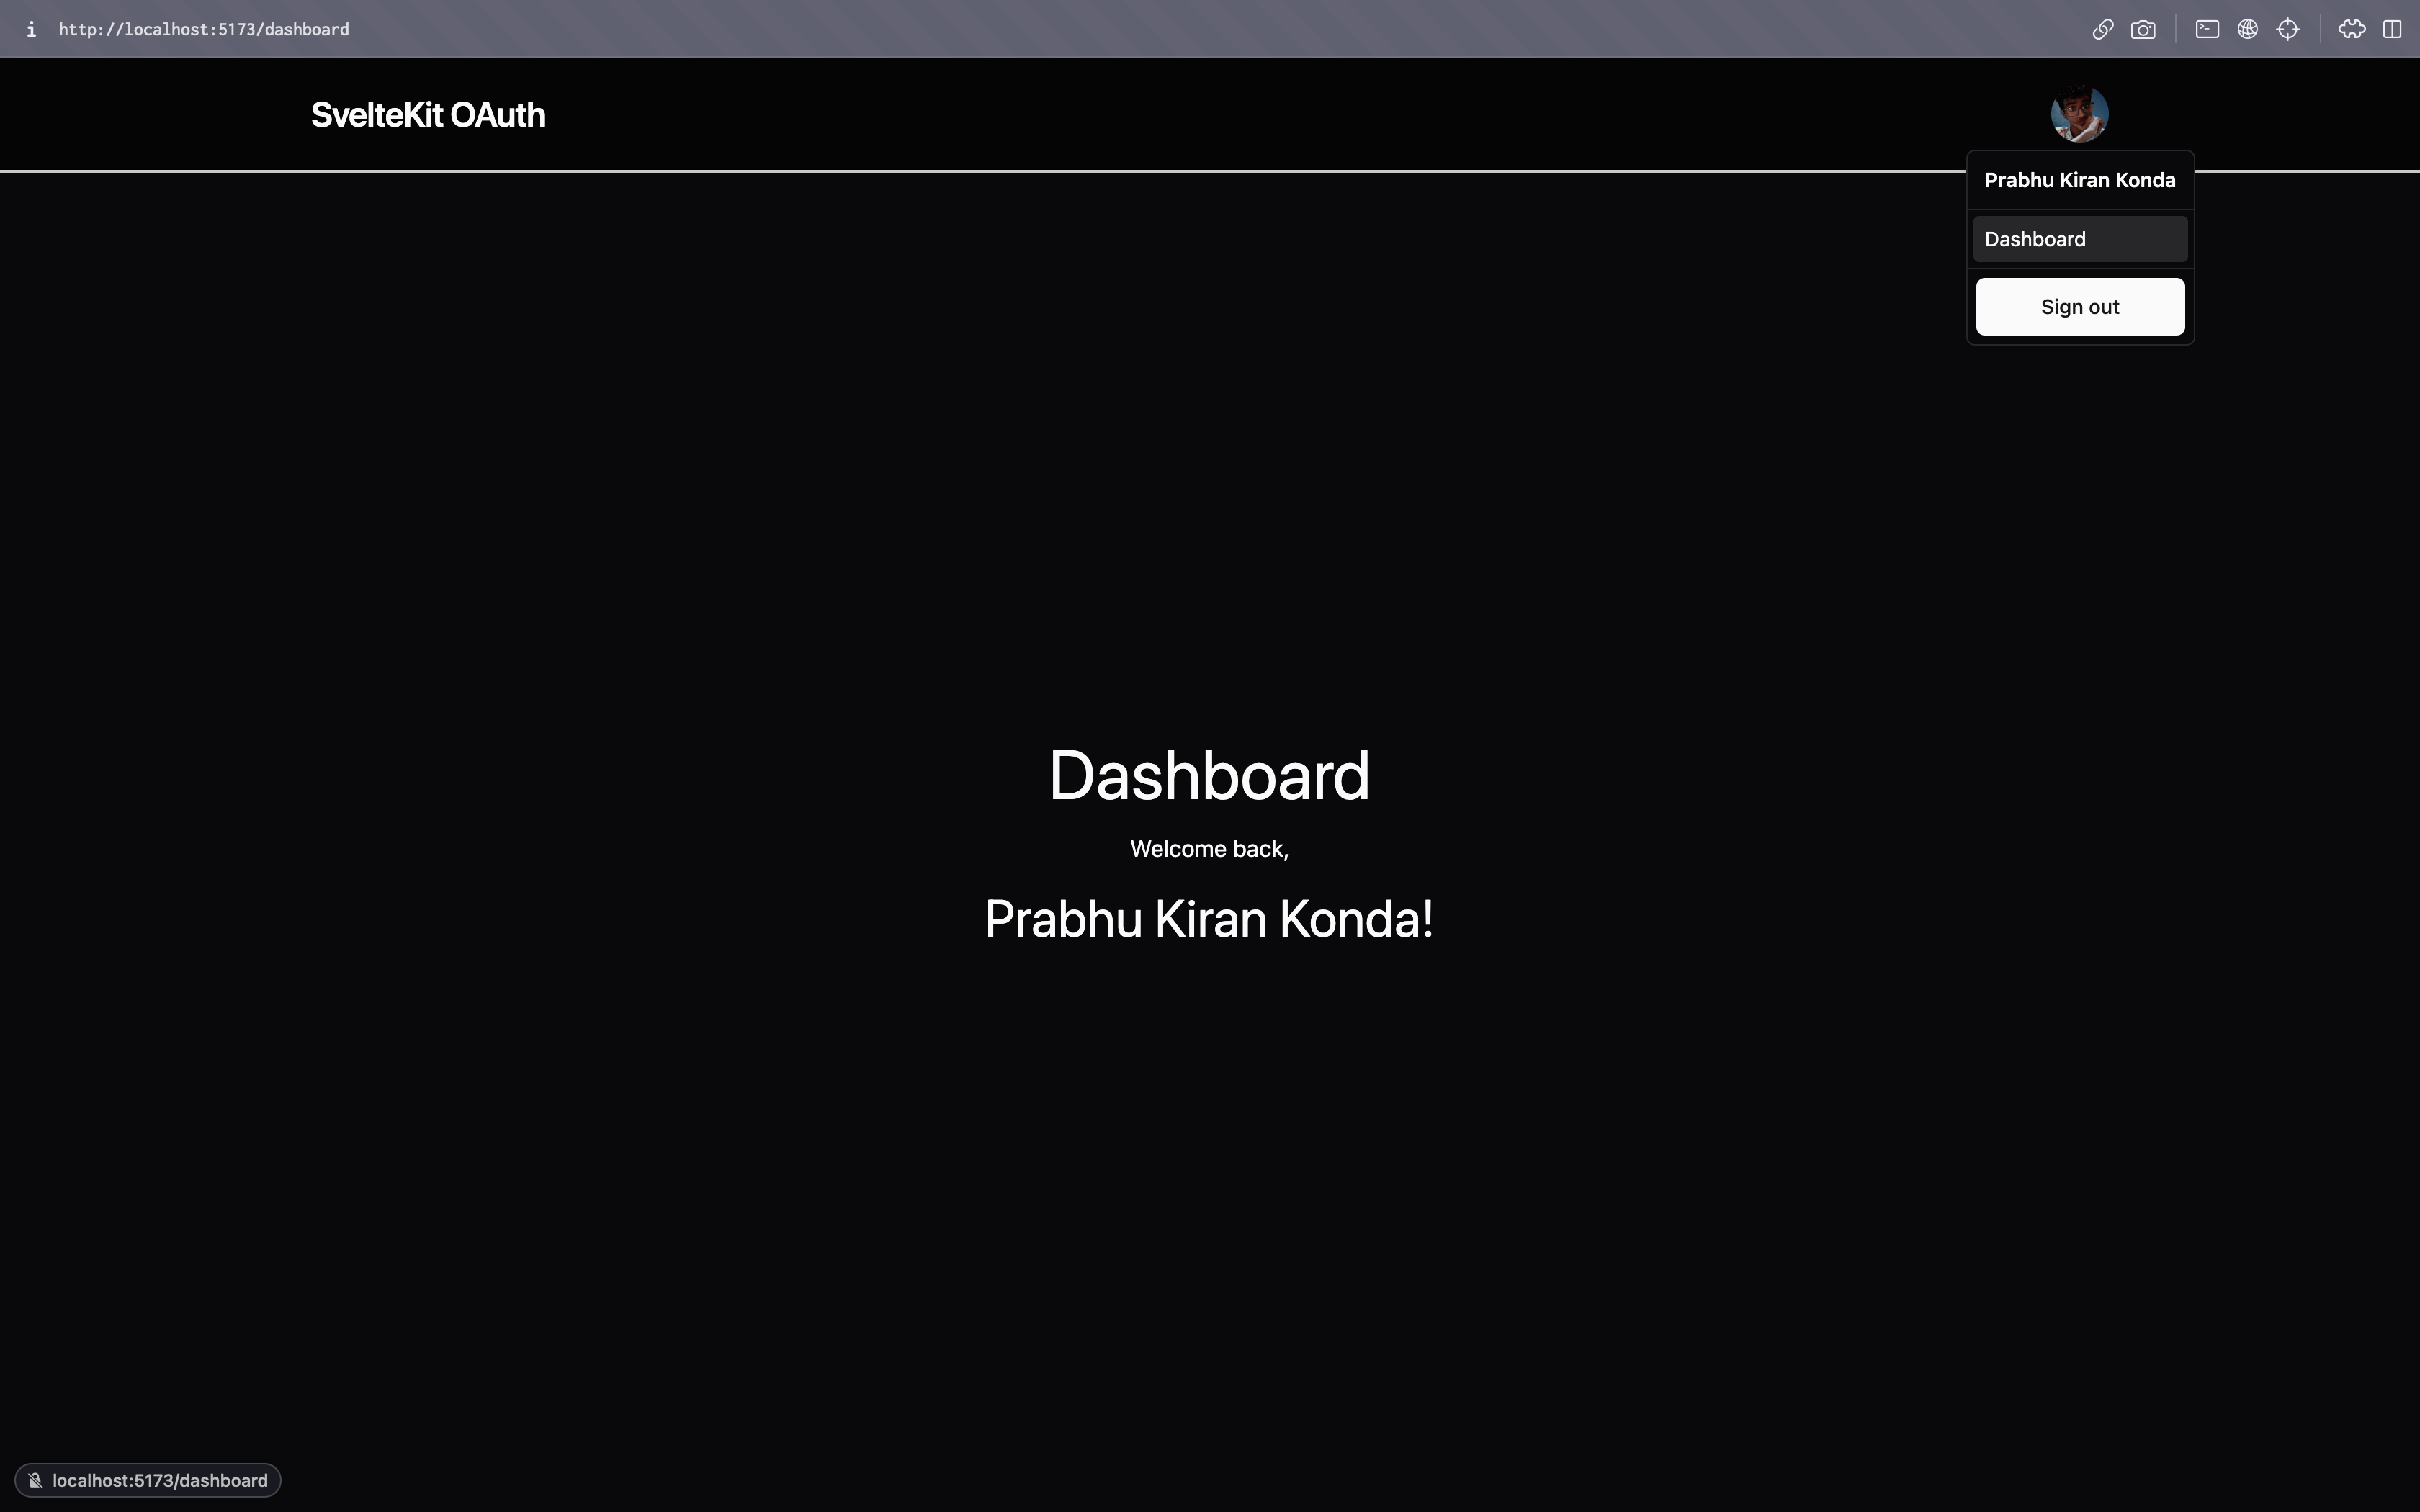
what the newly added lines of code does is, when a user is not logged in and tries to access the dashboard page, we redirect them to the login page and after they login, we redirect them back to the dashboard page.
you can use this code in any protected route where you want to redirect the user to login page if they are not logged in.
And that's it. we have successfully integrated Auth.js (NextAuth) and Prisma with SvelteKit. you can see the full code in my github repo.

Thanks for reading. If you have any questions, feel free to comment down below or reach out to me on twitter @prabhukirantwt.